How do I get started ?
Well you’re half way there already! To get and install the apps whether you want the desktop or mobile you need to download and install either from this website (the Android .apk) or from Apple’s appstore (mac desktop, iPhone, ipad) , or Microsoft store (windows11) . To be able to see the download links on the download page, but only if you’ve registereded and logged on
So Steps 1 register (while we are in testing mode a ‘freebie’ membership will offer all features including synchronisation between desktop and mobile. submissions to UKBF can be made but are sent to a simulator – cannot be used as a real submission but are validated just the same by UKBF)
Step2 download the relevant app. – the links to Apple will take you to the appstore and the Manifest6 app – if you link from a browser on a desktop you will download the Mac app. If you view the link on an iPhone or iPad you will download the appropriate app for those devices . The Windows link goes to Microsoft Store to download and install on Windows 11. The link for the android app can be downloaded on any device but must be transferred to your Android device in order to install, easiest to opn the download page ina browser on your android device – when it downloads, and you click on the app (Manifest6.apk) it will give warnings about ‘unknown app’ and advise against installing – override these
So to summarise:
To begin with you need to register as a member on this site in order to download the mobile app or the desktop version
You can choose to be a freebie member – some features will not be available (delayed sending, only one aircraft) also the freebie version carries screens which display messages or advertising. The alternative is to make a donation. Donations are valid for a year, offer full features, remove nag screens and indeed the apps are notably faster
The initial ‘popup’ screen will ask you to approve the use of your contacts. This is not unreasonable, a third of the declaration is about people. The apps use contacts to store yyour crew and passenger data
Once the app is downloaded the next ‘first time’ screen will invite you to enter a ‘cloud’ account. The app will work quite well without a cloud connection.It just functions as a standalone app which means if you switch device or platform you will not see your data synchronised – in other words if you’re happy to do all your work on one device it will function fine for you. If you want to do your planning on, say, a desktop then want to refer to all GAR documents on a mobile, you will need to specify your cloud service. You may need to click on settings to get to this screen
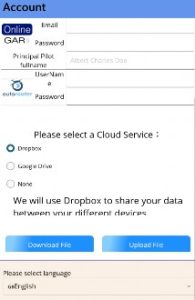
If you have a cloud service, go to the settings page and tick the relevant button. If this is a first time installation,this will take you to the cloud service provider’s authorisation page and you will be asked if you accept that this app (the root name may be Manifest6 or PprPal) has access to your cloud service. Authorise this and you will be able to synchronise all your GAR data via your cloud service.
How it works
The Private aviation declarations called GAR’s or Gendecs are
generally very similar for all countries requiring them in Northern Europe. They consist of three sections of info
| Aircraft | Trip | Crew/Pax Manifest |
|---|---|---|
| Aircraft details, reg, base, type | Journey – where to/from date time | who’s on board |
Different jurisdictions require different levels of detail. Fill in all fields on PPRPal/Manifest6 and you’ll cover all bases.
For example the aircraft detail required by UK includes who is either the operator or owner with required means of contact.
On the Passenger manifest some jurisdictions require place of birth. Most jurisdictions require to know the ‘status’ of the person (Pilot/Crew/passenger)
Obviously the journey details will change from one decclaration to another but the apps save frequently used data for future rapid entry use.
Aircraft data is stored within the app
Journey data is stored as a submitted or draft form ad can be ‘cloned’ to create a new form rapidly
Crew manifest is also stored as the submitted or draft form but individuals can be saved to your contacts/phonebook for
future recall
The main menu shown below offers options to create a new form/recall old forms enter aircraft details for future recall, enter crew details for future recall and settings. To get started simply create a new form
Create a GAR/Gendec
You can jump straight in and create a new GAR if you like. Of course you will not have any data for your default aircraft or crew you regularly fly with but creating a new GAR/gendec will populate such fields as it goes along
Click on the ‘create/review reports button. Note that if you have submitted previous reports or drafts or you have saved crew details the box above will tell you how many there are.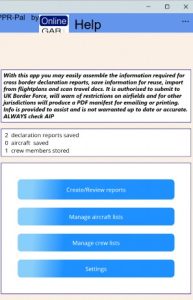
Note – to navigate back to main menu click on left arrow in upper left of screen

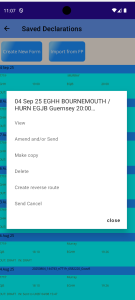
the next screen shows a list of drafts or successfully submitted forms – it will show whether they are drafts or
successfully submitted forms. If it is a submission to UKBorder Force it will show the receipt. This list screen therefore is a useful summary proof of your submission. So if you are challenged for your GAR/gendec you click ‘create/review reports’ and in this list you’ll see any receipts and date of submission
If the submission is to a jurisdiction which simply accepts a pdf or paper form you can set the printing or emailing of the of the form or its emailing to represent formal submission.
Clicking on any entry in the list will invite you to’view’ ‘amend’ ‘copy’ ‘delete’ ‘send cancel’ – note that if a form has been sent or is older than the present you cannot edit it. You must make a copy to prefill a new form and make sure to change the departure dates.
To create a new form
Click on the ‘create new form’ button If you want to create a brand new empty form dont click on the entries in the list (there wont be any first time around) Click on button at top of screen (we will return to using the ‘import a flight plan’ button later.)
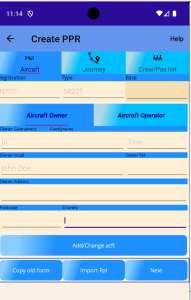 A tabbed screen appears – that means there are three ‘tabs’ at the top representing each of the three elements of a typical GAR/Gendec form viz
Aircraft ,Journey , Crew manifest
The default tab is the aircraft tab so let’s enter aircraft details
How do I enter aircraft details
The key fixed details are the aircraft registration, its type and where it is based. Clearly the registration is free form entry. The Type of aircraft is the official icao type. The app holds a list so start entering the first few letters and a drop down list will appear to select from. Entering where the aircraft is
based is the same as entering an airfield in journey tab. Enter the icao code or part of or place name and the app will offer a list to choose from
Below these entry boxes there are two more tabs for aircraft owner and aircraft operator. Generally you only need to fill in one. If you only fill in owner it will be assumed that the owner is the operator
Do not yet click ‘next’ this is for moving on to submission of the
form and if you haven’t completed the other tabs you will get an error message
The details are the same and are designed to allow the authorities to
know and contact whomsoever is responsible for the flight therefore
telephone/email postcode and country are mandatory as well as
name
Before we move on to entering a journey if you have aircraft saved
then all these details can be called up and filled in by clicking ‘Add or change aircraft’
How do I enter journey
You have some options in getting the information for the journey
Import from a FP
Cut and paste from an ICAO flight plan
Enter journey details manually:
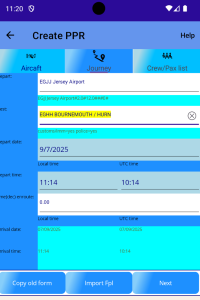
Clicking on journey tab at top of screen shows an entry form for journey details. You select departure and destination as you would enter an airfield. Type in the first few characters of the ICAO code or place name (IATA codes do not function) and select from drop down list. Note – only ICAO codes are accepted – we have yet to agree a protocol for lat and long and in anycase this may change with future prior permission regs. If you dont know the icao you may enter the place name.
Now enter departure date – this must be in the future butdoes not enforce strict notification times as are in force in UK. Note that on selection of the destination airfield a line below will show whether it is a customs/immigration/police designated field – This is important because in UK entry into UK from the Common Travel Area requires a different notification period depending on whether the destination field is police designated. If the field is non UK the line will say if it is a port of entry.
Having entered your date enter the local time of departure. You may enter UTC but it is easier to enter local time – the app calculates UTC time
Now enter journey time – You don’t have to state arrival time – this is calculated in both local and UTC from departure time and place plus journey time.
Note this is a ‘gotcha’ the app will default to a journey time which may not be actual. The risk is you submit a form which will have a wrongly calculated arrival time
These details can also be imported from a flight plan see below
NOTE all devices (iOS Android Mac) except Windows save crew/pax details to their contacts
database. This is convenient because you can ask a crew member/pax to simply send you a
contacts business card in vcf form. Windows does not give such easy access to your
contacts list so contacts on Windows are unique to windows
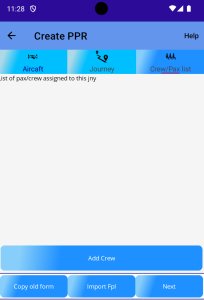
How do I enter crew/pax
Clicking on crew tab will bring up a list of previously used crew or crew you have saved.
If there are none simply click on the button ‘Add Crew’ at bottom of screen. This brings up a form which allows you to enter raw information aboutthe person, or invites you to call the details (name address) from your contacts OR read a business card file (.vcf) OR scan in passport details either from a photo or a picture file someone has sent you
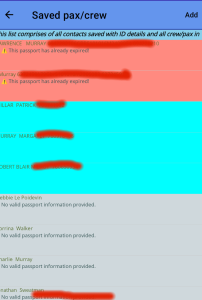
Note the list of saved crew/pax shows the saved details. This information is drawn from a) any contacts in your contacts book who have GenDec info saved in that record and b) anyone featuring on a previous form.
If the passport is out of date the entry will be highlighted in red, if within the EU 90 day period it will show as amber (EU rules require passport to be valid for 90 after exit date – it is up to you if you want to take a risk) The saved crew list shows the name and full passport number (this is not the short passport number at top right of your photo ID page it is the Machine Readable zone at the bottom of that page. It contains all needed info. It is saved in your contacts and is obfuscated for security Select a saved crew/pax or click on ‘Add’ (top right of screen)
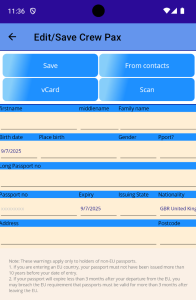
Ok This is probably the most tedious part as all fields are mandatory. You can, if you are careful, enter the second line of the long passport number (the Machine readable zone line2) and most field will update automatically but you still need to enter name address and postcode.
Some jurisdictions demand place of birth others do not. Best record all such detail.
The software will warn you if you make an error (up to a point) For example it is a frequent mistake to put the wrong Date of Birth in a pax record. Someone we know – a regular and frequent international flyer did just that. It cost him the trip. UKBF would not accept a new submission without the relevant 12 hours notice. So after being notified of the error he had to start all over again. Manifest6/PPRpal will help avoid this
Import a VCard
If you don’t have your crew or passenger’s details in your contacts you can ask them to send you a VCard. This is easily done – but it goes without saying your crew/copilot/passenger must have themselves entered in their contacts with address. The passport details are entered in notes with the MRZ (machine readable zone) second line long passport number entered in the notes field inside brackets with place of birth following. Now your copilot/crew/pax details show in that contact. You can share and send the contact (selecting all details) to your email or whatever place you request. Now you pick up the VCFcard once received from wherever you choose to save it somewhere you’ll remember (note that once you import it to PprPal, it is advisable to delete the original vcf record you were sent for ID security reasons
On clicking import VCF – you will note you can request a vcard via sms or whatsapp – this will guide your copilot/crew/pax in entering correct info
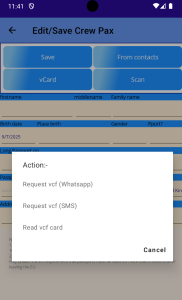
#
Right now we want to import a vcf file you have received. So click on ‘read vcf card’ and follow instructions
Scan
Depending on quality of image a photo of the passport ID page can be scanned.. A member of crew or passenger can send you a .png or .jpg image file and PprPal can recognise the data
Click ‘Scan’ button and select the image file. Its quite a neat trick but be warned – photos of passports with glare or reflection dont work – also those with redundant space (aa photo of most of the table the passport was laid on not just the photo page!!!)
.png files seem to work best as does good contrast. The engines of OCR are different on each platform, with Windows being the least successful
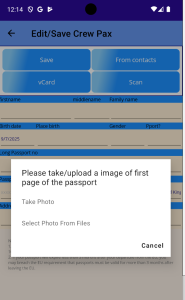
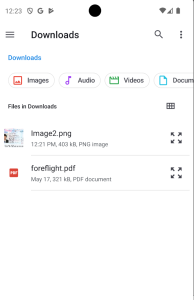
The option is to take a fresh photo of a passport photopage or refer to a saved file which has been sent to you. The app will open a file ‘explorer’ or ‘finder’ – It is up to you to navigate to wherever you saved teh incoming passport photo or photo taken with the camera. In the screen shot it is Image2.png
The Scanner will attempt to OCR the passport details
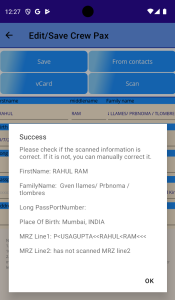
The scanner engine will report a ‘confidence’ percent indicating whether it thought the text had been successfully scanned – usually 60-70%. Note that the Windows app is less capable when it comes to OCR. Make sure that the image has no obvious light reflections and all details are easily readable. Sometimes teh image format matters. Try saving as a ‘.png’ file
The app will then show its interpretation before populating the fields in the form. Note it is not 100% accurate and names may be misspelt. Also the address and place of birth need to be added
Mobiles devices can do this scanning direct from the camera.
An invitation to save to contacts will appear – after this you do not need the photo of passport – delete it for security
NOTE: It is a good security practice to delete the photo file and the vcf file whichever you are using, once it has been interpreted.
Import journey details from Flight Plan
A facility which is often sought is the ability to create a Flightplan and port journey details over to your GAR/Gendec form. The first thing to say is that there are numerous Flight Bag FP software and each is different in the way it assembles and presents data. The second thing to bear in mind is that the ICAO FlightPlan does NOT call for much detail about the aircraft (other than type and registration). Also the ICAO FP does not require a Crew/passenger manifest. Therefore the best we can hope for when trying to import data from a Flight Planning Software is to fill in the journey details. The aircraft can also be filled in and if it matches to a saved aircraft in your database in PprPal then that will be automatically filled in. But you will have to enter the crew manifest
There is a wide range of Flight Planning software but the
principle ones are
Skydemon
EasyVFR
Foreflight
Garmin Pilot
Rocket route
Autorouter
PprPal makes provision to import from each of these but it is not always straightforward because of proprietary forms of data. Each requires a different routine to export the data then parse it into PprPal.
It is useful to note the different file formats and their peculiarities when trying to transfer FP data from FP software to PprPal. Skydemon saves its plans with a ‘,Flightplan’ extension. These can be imported into PprPal but lack journey time information so whilst a departure date and time can be inferred arrival time cannot. An alternative is to use the plog from
Skydemon. See below
Rocket route can export from both its browser based planner and its apps . Under Flight summary click on export and choose GPX type of file see below. The rocketroute version of a gpx file DOWS contain all relevant journey detail. Other FlightPlanning software can also export to GPX but is limited in date and timing info. Skydemon can export to a .gpx file but removes journey timing information and contains no aircraft info – don’t use it.(On the other hand a rocket route .gpx contains all the data we need) Again Skydemon can export to a garmin fpl – with this it is possible to infer departure date and time but journey time is not possible so it is less useful than other formats for Skydemon.
In GarminPilot app one can share a briefing pack – this is in pdf format (this is currently a work in progress for PprPal to read this)
Other export formats in GarminPilot are .gplt – which is binary and not readable by PprPal.
EasyVFR (aka PocketFMS) also exports in a number of formats
some more useful than others.
In Foreflight you may export the navlog as a pdf . (reading pdf flightplans from either foreflight or rocket route is still WiP
Skydemon
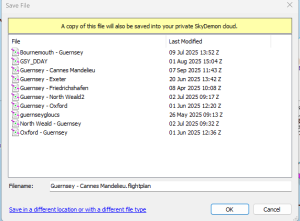
this is a dialogue from SkyDemon inviting you to save a flightplan.
note you can click on the blue link at bottom of screen to save in a different format
There are 2 ways of getting data from Skydemon into PprPal.
On the SkyDemon desktop app save the flightplan as a SD ‘.flightplan’ file in a place
you will be able to retrieve it. It automatically saves to the SD ‘cloud’ but this can only be accessed from within SkyDemon.
Therefore select ‘Save As’ and click on the link which says ‘save to a different location’
Note that at this stage you may also save the flightplan as a Garnin fpl file.
if you have aircraft instrument which can upload and show fpl files you might choose this but generally fpl files do not contain sufficient information for a GAR or Gendec
The other way is to save a Plog (Pilot Log) as an html file . PprPal can reasonably parse the data in that html file.
Select the menu item plog. On the top of that screen choose ‘save as html’ Once again choose a particular folder you will remember pointed out above it is not much use saving to the Skydemon cloud as it is only accessible through Skydemon. Therefore save these files to yourowncloud or a location on your local device. If you make a regular special place for saving these file you can enter the folder into PprPal and it then becomes a few clicks to import the data
AutoRouter
Autorouter is a free ifr flight router from Hassim Achenmuller who has generously allowed it to be free for personal use. www.Autorouter.eu. It is popular because it includes a routing algorithm similar to RocketRoute. It produces an icao flight plan. If you have an account then this can be entered on the settings page of Manifest6/pprpal and the rest is very simple – see below – clicking on import from autorouter gives you a list of your recent flightplans – selecting one will import all relevant details into the journey tab of Manifest6/PPRpal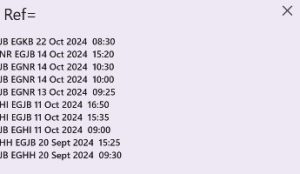
Foreflight
Foreflight is widely popular but is probably the more difficult to import from.
The only way to get PprPal to parse foreflight data is to create a pdf of the navlog. Navigate to the ‘Flights’ tab where your flight plan is.
Highlight your chosen FP. In the tab on right switch to Navlog.
Click ‘Share pdf’ and choose to save to your cloud service (dropbox/icloud/drive)
[Note currently PprPal is being developed to read the pdf]
EASYVFr
EasyVFR otherwise known as PocketFMS is a very popular European flightbag which can produce similar flight plan files.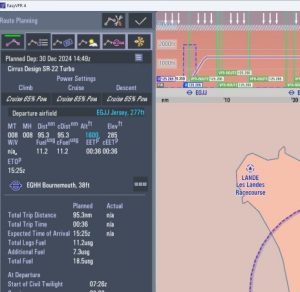
Click on the route icon lower left of screen 2nd of row of icons in shape of Y mThe Route panel will appear on left of screen. Now select the Tool icon leftmost top row of icons. Neither the .gpx nor the .fpl options contain all required data to construct a GAR or Gendec so use XML – again same procedure – save it to a common location where you can retrieve it with PprPal
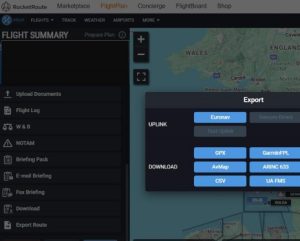
RocketRoute
Rocketroute is a flightplanning tool which includes an autorouting function which makes it popular with IFR flyers. It is a subscription service. A pilot log is created in PDF format, but it is easier to export a .gpx file.
image
However it also has the ability to export in ‘.gpx’ format containing all information needed. Note other FlightPlan software which can export to .gpx . ‘.gpx files generally do not always contain complete information required for a gendec/GAR but the rocket route one is more comprehensive
Navigate to Flight Summary. Select ‘Export’ choose GPX format – then specify where you want to save. If you are
using PprPal on ht esame machine as your FlightPlanning software you may save to the local file system or if you are using separate devices its probably best to use a ‘Cloud’ service
Garmin Pilot
Garmin Pilot – On the FlightPlan page just above the map far left there is an upload icon. Choose ‘print Navlog’ –
choosing ‘Share Route Data’ simply creates a gplt file which cannot be read.
Choosing ‘Print Nav log’ will show the default navlog format on screen (do not change the default format or any import will fail)
Now there is an upload icon at Top right of this screen . Choose to save to your preferred cloud service
(Dropbox/Drive/iCloud) (once again reaading a pdf file by Manifest6/PPRpal is a WiP)
Importing a flight plan – general summary
The journey details can be imported from a flight plan. Different Flight Planning software stores different amounts of
data so importing from a FP generally only populates the journey details
Clicking on the ‘import from FP button offers a choice of
sources. Choosing autorouter for example demands your account for direct access whereas the other choices involve reading a file created by the Flight Plan software
The aircraft and journey are imported and the fields populated. NOTE some FP software records only the registration of the aircraft and the Declaration requires more owner or operator information which you will have to add.
In particular ETE (estimated time enroute) should be checked. If the aircraft reg is already saved in your app data then this will populate the operator/owner details. If there is a PiC (Pilot in charge) name on the flight plan and your details are saved in the app/contacts then th ePiC will be added to the crewlist
How do I send
At the bottom of the gendec/gar form with the three tabs -(aircraft/journey/crew) you will see a ‘next’ button
clicking on this gives the following choices.
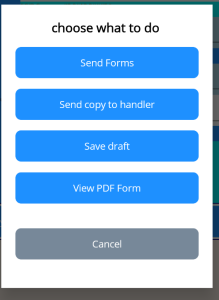
Send forms will – if the trip begins or ends at a UK airfield (excluding CTA) – to the UK Border Force [note at present during testing this sends to a UKBF server which simulates a live submission and carries out all checks. DO NOT USE THIS AND EXPECT IT TO SUBMIT A LIVE gar . DURING TESTING THIS FACILITY WILL GIVE ERRORS WHEN USED OUTSIDE BUSINESS HOURS
As said elsewhere the apps do a lot of checking for errors and mistakes so generally there should be no error coming back from UKBF.
If the trip ends in Guernsey/Alderney Jersey IoM, Ireland then a pdf or the relevat jurisdictions GenDec will be contructed and sent to them. The apps also currently generated a Belgian and Netherelands form as well as a ‘douane’ form which is valid for some French airfields
The other options include sending details to a handling agent, saving a draft (though the app automatically saves entries as you go along) You may view any pdf’s created for the trip and share thenm using email or whatsapp
How do I review submissions
if the trip is in the future then you may still amend and view it using the edit/amend screens
If the departure time has passed you may call up ‘View’ which will show all relevant details including any receipts